Showing posts with label recipe. Show all posts

Friday, April 11, 2014

Friendship Cookies: Sweet + Salty Chocolate Chip


Baking is such a special thing. Butter, sugar and flour has a language of its own - as nerdily as it sounds - it's pretty much one of love and caring. No one's going to make you a birthday cake or a batch of homemade cookies if they hate your guts. Well maybe they'll make you a poison apple or put a worm in your cupcake! But no, when someone bakes you something - they do it because they love you, they care aboutcha, they support you and want to make you feel good if you're feeling crappy, or feel better if you're feeling sad, or feel special if it's your birthday, or they miss you so they make you a little treat. Because sometimes just eating a really good cookie can make you forget any life crappiness for the tiny minute that it takes for you inhale it. And I've never known anyone who hasn't been at least minutely stoked to receive a batch of homemade cookies!!! Cookies have POWERS. Or at least they can be a symbol of crunchy yummy salty sweet delicious caring.

These cookies are made with spelt flour, too - so while they're decadent in the butter and extreme-o chocolate-ness, spelt is high-fibre! Great! 

Sweet + Salty Chocolate Chip Cookies

Ingredients:

1 cup unsalted butter, room temperature
1 cup of golden brown sugar
1/2 cup granulated white sugar
1 egg
1 teaspoon pure vanilla extract
3 cups whole spelt flour
1 teaspoon sea salt
1/2 teaspoon baking powder
2 cups (about two 100 gram bars) of high quality semi sweet chocolate, broken into pieces (I used 49% cocoa Lindt Surfin)

Make It!

Preheat oven to 350 degrees. Line three metal baking pans with parchment paper.

1. In the bowl of a stand mixer, beat the butter and sugars on high until light and fluffy, about two minutes.
2. Add the egg and vanilla extract and beat on high until incorporated, using a spatula to scrape down the sides of the bowl.
3. In a medium bowl, sift together the spelt flour, salt and baking powder.
4. Pour the dry ingredients into the butter and sugar mixture; beat on low until combined, scraping down the sides of the bowl.
5. Throw in the chocolate and mix for a few seconds until incorporated.
6. Using a small retractable ice cream scoop or clean hands, dole out 1.5 inch round balls of cookie dough evenly spaced onto baking sheets. Optional: place a piece of chocolate on top of each cookie for extra chocolate blast! 
7. Bake for 12-14 minutes, rotating pans halfway, until chocolate is melty and cookies are lightly browned on the bottom.
8. Remove from oven, let cookies cool on wire racks.


What do you think - what's your go-to, make-someone-happy move?? I'd be pretty happy to eat a bacon cheeseburger with fries right about now, in case someone out there felt like making ME happy! ^__^

xo Lyndsay 

Tuesday, April 8, 2014

Sweetest Of Them All: Strawberries + Cream Birthday Cake


There's nothing more girly and pretty than a pink strawberry cake. I was feeling the urge to make something very pink for my mother in law's birthday - and the organic strawberry jam in the fridge was calling my name too. I've been suffering from a case of work life balance lately - I have so many ideas and things I want to do for photoshoots and cakes, recipes and flavour ideas - yet of course I am a wife and mother, too - sometimes I feel I could get so much more done and really live up to my potential if I could just "work full time" on my ideas (haha) - but then I laugh at this thought as soon as Teddy jumps on me to give me a sweet unprompted hug, or babbles out the new words he learned or wants to sit on my lap and have me read him a book. I have two days a week where we have childcare and I power-work - baking, photographing and madly blogging and making work for my freelance jobs. Weekends I attempt to still do cake orders but then that impedes on our time together as a family...  I dunno.
Still, at least I found time to make this pretty cake for my mother-in-law! It delighted her - which delighted me. It was actually fun to make something so simple, pink and pretty to look at.

This cake tasted just like strawberry ice cream to me! Which I've realized is one of my favourite flavours. Up there with chocolate and peanut butter ice cream. So here's the recipe:

Strawberries + Cream Birthday Cake

Ingredients

For The Cake:

1 cup unsalted butter
1 3/4 cups granulated white sugar
4 eggs
1 teaspoon pure vanilla extract
1/2 cup of strawberry preserves
2 cups of heavy cream
3 cups all purpose flour
1 tablespoon baking powder
1/2 teaspoon sea salt

For The Buttercream: 
2 cups unsalted butter
4 cups of icing sugar
2 teaspoons pure vanilla extract
1/4 cup of strawberry preserves
dash of cream
tiny amount of pink gel food colouring
pastel sprinkles - I used India Tree brand Nature's Colors Carnival Mix Sprinkles

Make It: 

Preheat oven to 350 degrees. Grease and flour three 7x2 inch round cake pans. I also cut parchment paper rounds to place in the cake pans to help with nonstick powers. 

1. Using a stand mixer, cream the butter and sugar on high until light and fluffy.
2. With the mixer on low, add eggs one at a time until fully incorporated. Add vanilla and strawberry preserves and mix until incorporated.
3. In a medium bowl, sift the flour, baking powder and salt.
4. With the mixer on low, add the flour in three parts, alternating with the heavy cream until just mixed. Do not overmix!
5. Divide batter evenly into three greased, floured and lined cake pans.
6. Bake at 350 degrees on the center rack of your oven until a wooden toothpick inserted in the middle comes out clean - about 25 minutes.
7. Let cakes cool in pans on wire racks.
8. Meanwhile, make the buttercream: beat all ingredients on high speed until light and fluffy!
9. Using an offset spatula, frost and fill cake layers, frosting the entire exterior of the cake. Using a cake icing smoother, smooth the frosting then place in freezer for 15 minutes to set.
10. Do a final frost of the cake, smoothing again with the icing smoother. Optional: pipe drop stars around the top for a border (you'll need a piping bag fitted with an open star tip) and lightly dust with pastel sprinkles! I added a fresh organic strawberry for decor.


Yeah that work/life balance thing... what do you guys do to make it "work?" Or do you find, like me, that's it's a constant process of negotiation? That seems pretty okay too. Whenever I'm feeling down and struggling a bit with feeling overwhelmed, it's nice to know I'm not alone - here are two great posts on the topic:

That Juggling Thing by Oh Joy, and then this post on blog reality vs REAL reality: I've Been Thinking About This by The Day Book. (my house is currently a post-vacation mega explosion - and You Will Know Us By The Trail of Teddy is my constant daily reminder that I have a toddler in the house! But I can't have that clutter in a strawberry cake photograph, right? Ha...)

Ok guys! Til next time... hope you're doing great...

xo Lyndsay

Thursday, March 27, 2014

Donut Try To Take My Donut Pan: Pretty Palette Of Donuts + Recipe


Gosh darn it I loved making these colourful pretty little gems. I used my newfound and trusted donut recipe to make these in my donut baking pans. Mauve, peachy rose and mint green tinted vanilla milk glaze with a light dusting of rainbow sprinkles. The lovely Tamara Taggart asked me if I would make donuts for her for a photoshoot for the Glitter Guide - how could I say no to such a sweet and beautiful lady??

One of my Instagram followers noted that the donuts look like Froot Loops! Made me want a bowl of crunchy fake-fruity Froot Loops instantly, and it gave me a great idea for a future donut flavour! So fun! I have a sugar problem!! Oh and here's the donut recipe again after this photo.


Vanilla Nutmeg Cake Donuts
(recipe adapted from King Arthur Flour)


Yield: 1 dozen donuts + 1dozen mini donuts
1/4 cup unsalted butter
1/4 cup vegetable oil
1/2 cup granulated white sugar
1/3 cup golden brown sugar
2 large eggs
1 1/2 teaspoons baking powder
1/4 teaspoon baking soda
1 teaspoon ground nutmeg
3/4 teaspoon sea salt
1 teaspoon pure vanilla extract
2 2/3s cup all purpose flour
1 cup whole milk

For the glaze:
1 cup of icing sugar
1 teaspoon pure vanilla extract
5 teaspoons whole milk
Sprinkles (optional)
Gel colours in fuchsia, purple and green

(I made three bowls of this glaze using the same amounts so I could tint each bowl with a different colour - you need to make a decent amount of glaze for donut dipping otherwise the dipping concept doesn't quite work).

Make it!

Preheat the oven to 400 degrees. Oil your donut baking pans.

1. In a medium bowl, cream together the butter, oil and sugars until smooth and creamy.
2. Add the eggs, mixing to combine.
3. Stir in the baking powder, baking soda, nutmeg, salt and vanilla extract.
4. Add the flour into the wet mixture, alternating with the milk until combined. Do not overmix.
5. Fill your donut pans 3/4 full with the donut batter. I used a piping bag with pretty nice results.
6. Bake at 400 degrees for 8 minutes, or until lightly browned and a toothpick inserted in the middle comes out clean. Do not overbake!
7. Remove donuts from pans and let cool on wire racks.
8. Meanwhile, make the glaze: whisk together icing sugar, vanilla extract, milk and desired food colouring until smooth.
9. Once donuts are cool, dunk the donuts into the glaze. Add sprinkles if so desired!

Imagine showing up at your next birthday party with a big old plate of these? Best friends would be made for life. Or at least the duration of the party.

Happy snacking, cake pals! (donut pals??)

xo Lyndsay

Monday, March 17, 2014

A Little Pep In Your Step: Easy Peppermint Chocolate Ice Cream


Irish or not, many of us ice cream lovers out there go wild for that minty green peppermint chocolate chip ice cream! This simple version is a snap to make with just a few ingredients. Blast on over to Poppytalk for this breezily easy peppermint chocolate ice cream recipe.

Thursday, March 6, 2014

Coffee Icing Glazed Vanilla Nutmeg Donuts


I finally found a sweet recipe for baked donuts that remind me of non baked donuts! The last few recipes I've tried were more on the cakey side - ie, they taste kind of like cake batter baked into a donut shape - but these guys really had that dense nutmeg heavier vibe going on - then, dripping with a thick layer of coffee icing glaze, well they're frigging delicious.

I wanted to mix it up with glaze flavours and looked through my extract collection - this Nielsen Massey coffee extract stared me in the face. The taste of the glaze reminded me of the wonderful lazy daisy vanilla cake my grandma would make for me, dripping in glaze made from instant coffee and icing sugar. I honestly was scraping dried glaze off the plate and eating it. Oh, and eating it by the spoonful. I think I like coffee flavoured things, maybe? Haha!

Coffee Icing Glazed Vanilla Nutmeg Cake Donuts 
(recipe adapted from King Arthur Flour)
Yields 1 dozen donuts

Ingredients

For the donuts: 
1/4 cup unsalted butter
1/4 cup vegetable oil
1/2 cup granulated white sugar
1/3 cup golden brown sugar
2 large eggs
1 1/2 teaspoons baking powder
1/4 teaspoon baking soda
1 teaspoon ground nutmeg
3/4 teaspoon sea salt
1 teaspoon pure vanilla extract
2 2/3s cup all purpose flour
1 cup whole milk

For the glaze:
1 cup of icing sugar
1 teaspoon coffee extract
5 teaspoons whole milk
Sprinkles (optional)

Make it!

Preheat the oven to 400 degrees. Oil your donut baking pans.

1. In a medium bowl, cream together the butter, oil and sugars until smooth and creamy.
2. Add the eggs, mixing to combine.
3. Stir in the baking powder, baking soda, nutmeg, salt and vanilla extract.
4. Add the flour into the wet mixture, alternating with the milk until combined. Do not overmix.
5. Fill your donut pans 3/4 full with the donut batter.
6. Bake at 400 degrees for 8 minutes, or until lightly browned and a toothpick inserted in the middle comes out clean. Do not overbake!
7. Remove donuts from pans and let cool on wire racks.
8. Meanwhile, make the glaze: whisk together icing sugar, coffee extract and milk until smooth.
9. Once donuts are cool, dunk the donuts into the glaze. Add sprinkles if so desired!

I seriously donut lie when I say this recipe is a goodie.
What's your favourite baked donut recipe? Would love to know!

xo Lyndsay

Tuesday, November 12, 2013

Raspberry Glacé Rosewater Cupcake Icing


I'm in love with this simple and pretty combination ... vanilla cupcakes baked in silver cupcake liners with raspberry rosewater glacé style icing. Classy times, guys.

RASPBERRY ROSEWATER ICING 

You will need: 

1 1/4 cup icing sugar
3 tablespoons of raspberry juice
a teensy amount of rosewater (it is a very powerful flavour - I used about 1/16th of a teaspoon!)

Make it!

Stir the juice into the sugar until combined. Add the rosewater. Thin out with more juice or thicken with more icing sugar as needed. When making your cupcakes, spoon only a small amount (2 tablespoons) into the cupcake liner. This will leave room for the icing.

Once the cupcakes cool, spoon the icing on top of the cupcakes and spread to the edges of the cupcake liner. Top with a rose petal or sugar flower.

Have you worked with glacé style icing before? What is your favourite thing to glaze? I love the drippy look of it on anything! Especially donuts... I can't wait to make donuts with some extreme drippy glaze-iness and sprinkles power.

Happy baking, cake pals!

xo Lyndsay

Wednesday, November 6, 2013

Ginger Maple Pumpkin Pie Recipe + Holiday Table Decor Tips


Today's post is sponsored by Minted.com

I've always been fascinated with American Thanksgiving, guys. It seems WAY huger than Thanksgiving is here in Canada - am I right? Kids travel home from college for Thanksgiving, people fly or drive thousands of miles and everyone comes together as friends or a big old family for a beautiful feast of love and food - kind of like how my family would do it up for Christmas. Planes, Trains and Automobiles is the perfect example- people want to get home THAT badly for Thanksgiving. 

Man, John Candy. What a guy. COMEDY!

As with any party I throw, I like to mix it up - for my Thanksgiving dessert table, I used vintage pieces (such as my pie server and 1960s modern brown teapot) with handmade decor, pretty linens and flowers from the garden, and Minted party supplies such as that crazy cute GIVE THANKS fall foliage designer banner. 

The fun thing about creating your own look and feel for your Thanksgiving party is that you don't have to follow the rules. The GIVE THANKS came as a banner with pre-cut holes and some cute twine to string it along - I decided to mix it up and use some Japanese washi tape to stick it up, instead. 

With the extra banner pieces, I cut out the leaf design shapes and adhered them to tall wooden BBQ sticks as unique cupcake toppers and put them on top of my wooden cake stand.

For more fall colours and texture, I clipped a stem of burgundy hued hydrangea from ye olde hydrangea flower bush in our front yard and placed it in a simple white egg shaped vase. Cute!

Cruciality: you have to have some WICKED AWESOME treats when you throw a party! I'm a baking nut (I'm sure you know this by now) and have been loving this spicy creamy pumpkin pie - black pepper, maple syrup and ginger pumpkin pie with a buttery gingersnap crust. Don't fear the pie! This one is stupid easy to make - top with not-too-sweet maple syrup whipped cream and you've got a pumpkiny knock-out pie.


Ginger Maple Pumpkin Pie with Black Pepper

For the filling, combine: 

1 can of pure pumpkin (around 400 ml)
3 eggs, whisked
1/2 cup brown sugar, packed
3/4 cup pure maple syrup
1 teaspoon ground ginger
1/8 teaspoon fresh ground black pepper (or to taste)
1/2 teaspoon fine sea salt
1 cup heavy cream (I used 33% percent)

For the crust: 

gingersnap crust (from Martha Stewart

1 3/4 cups gingersnap cookie crumbs. (I used Anna's Ginger Thins - I placed the content of about one and a half boxes into my food processor and ground it until crumb-like in texture).
1/4 cup brown sugar
1 tablespoon all purpose flour
1/2 teaspoon sea salt
4 tablespoons of unsalted butter, melted.

Melt the butter over the stovetop or in a microwave. Mix together all of the ingredients with the butter and press the mixture into a 9 inch pie pan. Bake at 325 degrees for 7-9 minutes until crust is set, being careful not to burn it. Let cool completely on wire rack.

To assemble the pie:

1. Pour the pumpkin pie filling into the cooled gingersnap crust. 
2. Bake at 350 degrees for 40-45 minutes until set.
3. Remove from oven and let cool completely on wire rack. 
4. Make your whipped cream!

Now, cut yourself a slice, plop a big old pile of whipped cream on top and enjoy!


This lovely post was brought to you by Minted.com! Find all of your Minted holiday decor right here - mix it up with some vintage and handmade DIY pieces - and you have a party to call your own! Woot!

What is your Thanksgiving or holiday decor go-to style? Easy breezy slam-it-up easy? Sparkly, ruthlessly edited and glitzy?Would love to hear! 

xo Lyndsay

Monday, October 7, 2013

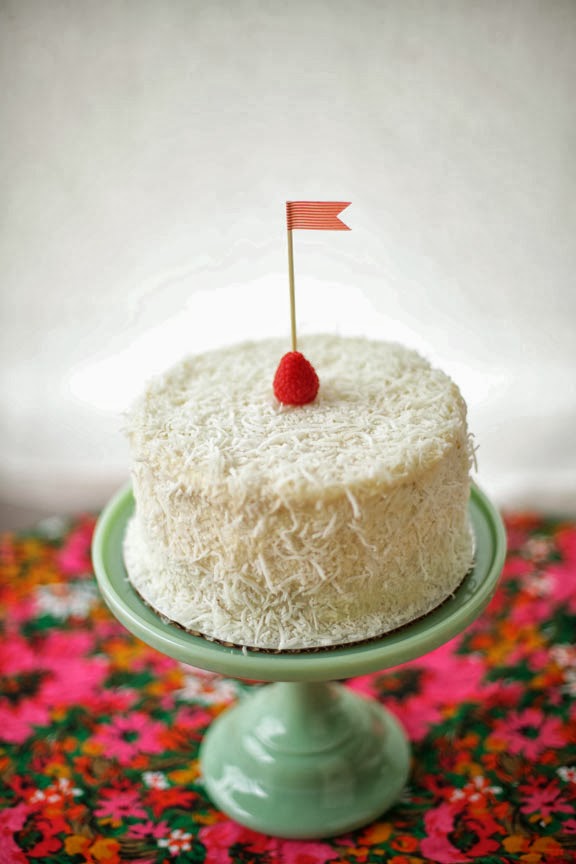
Fluff + Puff: Coconut Raspberry Snowball Cake


A pretty little beauty of a cake. I love the look of the snowball cake - mine has coconut cake layers with a hint of pure almond extract and it is filled with raspberry jam, iced in vanilla creamcheese frosting and covered in white shredded coconut. Topped with a fresh raspberry, I think it's quite an adorable vintage-looking cake, don't you? 


COCONUT RASPBERRY SNOWBALL CAKE

You will need: 

For the cake: 

1 cup (2 sticks) of unsalted butter, room temperature
11/2 cups of granulated sugar
4 eggs, room temperature
1 teaspoon pure vanilla extract
1/2 teaspoon pure almond extract
3 cups of all purpose flour
2 cups of packed shredded unsweetened coconut 
1 tablespoon baking powder
1/2 teaspoon sea salt
2 cups of high quality coconut milk

For the frosting: 

1 cup (2 sticks) of unsalted butter, room temperature
1 cup (2 sticks) of plain cream cheese, room temperature 
4 cups of confectioner's sugar, sifted
2 teaspoons pure vanilla extract
2 cups of sweetened or unsweetened shredded coconut

Make the cake: 
Preheat oven to 350 degrees. Butter and flour (or spray with cooking oil) two 9 inch round cake pans and line the bottoms with parchment paper. Set aside. 

1. Using a stand mixer in a mixing bowl, beat the butter and sugar on high speed until light and fluffy. 
2. On low speed, scrape down the sides of the bowl and add the eggs, vanilla and almond extracts until incorporated. 
3. In a medium bowl, sift together the flour, shredded coconut, baking powder and sea salt. 
4. With the mixer on low, working in thirds, alternate the coconut milk with the dry mixture, mixing until combined. Do not overmix. 
5. Pour the batter equally into your round cake pans. Using an offset spatula or butter knife, spread the batter around the pan so it is distributed evenly.
6. Bake in the middle rack of your oven for 26-28 minutes, rotating cake pans halfway through. Check to see if the cake is finished by inserting a clean toothpick in to the center of each cake pan.
7. Set cakes to cool in their pans on wire racks.

Make the frosting:  
1. Using a stand mixer, beat the butter and cream cheese together on high speed to combine.
2. With the mixer on low speed, slowly add the confectioner's sugar one cup at a time.
3. Add the pure vanilla extract. Beat the frosting on high until light and fluffy.

To assemble the cake: 
1. Once cooled, remove your cakes from the cake pans. Using a serrated knife level your cakes to create a flat cake surface. 
2. Place one layer of cake on a cake board or cake stand. Using a piping bag fitted with an open circle tip filled with vanilla creamcheese frosting, pipe a dam of frosting starting from the outside of the cake layer working your way in. Pipe three rotations of frosting, leaving an empty space for the jam.
3. Using a spoon, fill the empty space with jam to create a filling. 
4. Place second layer on top of cake. Press down lightly to adhere. 
5. Using an offset spatula, frost the entire exterior of the cake. 
6. Place cake in the freezer for ten minutes for frosting to set. 
7. Remove cake from the freezer and add another layer of frosting. 
8. Using clean hands, cover the entire cake with shredded coconut. I just grab coconut by the handfuls and pat it into the frosting until covered. 
9. Top with a fresh raspberry!


xo Lyndsay 

Friday, October 4, 2013

Cookie Problems: Coconut Macaroon Recipe


Coconut macaroons - simple, sweet, chewy, crunchy with a touch of pure almond extract and plenty of coconut, of course. This recipe uses Smitten Kitchen's "throw 'em in a food processor" method for easy mixing. Blammo - you're done!

EASY COCONUT MACAROONS (Yield: 1 dozen)

You will need:

3 cups sweetened shredded coconut
4 egg whites
1/3 cup granulated sugar
1 teaspoon pure vanilla extract
1/4 teaspoon pure almond extract
teensy pinch of sea salt

Make it!

Preheat oven to 325 degrees. Line a baking sheet with parchment paper.

1. Blend all of your ingredients in a blender or food processor for 1 minute.
2. Scoop out using an ice cream scoop onto your baking sheet.
3. Bake for 25-30 minutes until coconut looks cutely browned on top, turning pans halfway to ensure even baking.
4. Let cool on baking sheet.
5. Pile them up on a plate and lie in bed with a beautifying face mask on, snacking on the macaroons like bonbons.

Styling tip: I wanted to add some colour to my plate of macaroons so I added fresh berries and some pretty petals and flower buds from my own garden. What are your favourite ways to jazz up a food photo? 

Coco Cake Land elsewhere this week: 

Want to know some easy tips for photographing your cakes successfully? Check out my post on How To Photograph Cakes on Craftsy.

I'm in LOVE with these frilly, ruffly, feminine ballerina-inspired cakes on Craftsy. 

Shrooming and zooming away at Handmade Charlotte - mushroom cupcake topper DIY.

Happy Friday everyone!

xo Lyndsay 

Friday, September 20, 2013

Cookie Problems: Peanut Butter Milk Chocolate Cookies


I got 99 problems and a cookie is one. 

Cookie problems!

Guys, does anyone else have major devouring issues when it comes to peanut butter and chocolate as a combination? A few weeks ago I was craving PB+C so bad that I put one spoon of peanut butter in my mouth, crammed in some chocolate chips and then jammed in some graham cracker crumbs. Brutal. And I wonder why my muffin top won't budge. It's more of a cookie top at this point. If you've got the craving and you have 20 minutes, you'll be able to slam these puppies together rather quickly. Plus, I used spelt flour to pretend it's healthier, so you've got that on your side, too.

PEANUT BUTTER MILK CHOCOLATE COOKIES WITH MALDON SEA SALT

You Will Need: 

1 cup of unsalted butter at room temperature
1 cup of unsalted smooth peanut butter
1/2 cup granulated white sugar
1/2 cup golden brown sugar, firmly packed
1 egg, room temperature
1 teaspoon pure vanilla extract

11/4 cups of spelt flour
1/2 teaspoon of baking powder
1/2 teaspoon of baking soda
1/2 teaspoon of sea salt

2 cups of good quality milk chocolate pieces - save some pieces to decorate the tops of your cookies. I used Lindt milk chocolate. 

a few tiny flakes of Maldon sea salt for the tops of each cookie


Make it!

Preheat oven to 350 degrees. Cover two baking sheets with parchment paper.

1. In a stand mixer or using handheld beaters, cream together the butter, peanut butter and sugars on high until light and fluffy.
2. Scrape down the bowl. On low speed, add the egg and the pure vanilla extract. Mix until incorporated.
3. In a medium bowl, sift together the dry ingredients.
4. With the mixer on low, add the dry ingredients to the butter/peanut butter mixture until a dough forms. Mix to combine.
5. Add milk chocolate pieces. Mix on low to combine.
6. Using a small ice cream scoop or your clean hands, scoop out 1 1/2 inch balls of dough evenly spaced on your parchment paper lined baking sheets.
7. Press a piece of milk chocolate onto the top of each cookie.
8. Bake at 350 degrees for 11-13 minutes, turning pans halfway to ensure even baking.
9. When the cookies are out of the oven, add a few Maldon sea salt flakes to the top of each cookie.

Now load up a plate and I'll meet you on the couch for snack and relaxation time!

Enjoy!

xo Lyndsay