Showing posts with label sponsored post. Show all posts

Wednesday, December 4, 2013

Peppermint Party - Silver Fringe Letter Garland DIY


Today's post is sponsored by Minted.com 

Happiness and joy - I finally made something fringe! I admire my pal Kelly over at Studio DIY's magical wicked awesome fringed wonders all the time - I pin them and drool over them and say, oh yeah. I'll make that - but never get around to it! My peppermint party for Minted seemed like the perfect opportunity to make a silver fringe letter garland - since I'm nuts about lettering and typography, too. Plus, I'll let you in on an easy breezy supplies secret - (also known as: didn't have time to source silver mylar) - I used regular old tin foil and some recycled cardboard to make it. 

You can find everything you need to make this super cute JOY letter garland in your own home, bringing some wordy sparkle to your holiday this year. 


I was also inspired by the insane in the membrane crafty awesome Jenny over at Hank + Hunt - I saw her super cute LOVE letter garland and I... loved it. Hee! 

Here we go - get into the garland party zone!

You will need: 
  • Tin foil, cut into strips - I cut mine into 1 inch tall strips. 
  • Scissors
  • Gluestick
  • Cardboard
  • String
  • Tape


Step One: Cut out your letters from cardboard. I freehand drew my letters onto the cardboard - if you wanted a particular font you could always print out large letters off your computer, trace onto cardboard and work from there. My letters are about 8 inches in height. 


Step Two: Cut strips of tin foil off in 1 inch high strips. Start fringing away your strips - snip snip snip! Approximate the length across the letter you're working on and cut to the general size. Note that the tin foil has one extra shiny side and one more matte side. Glue down your first fringed tin foil strip, shiny side up, at the bottom of the letter and work your way up. Don't worry if your tin foil fringe length is too wide for the letter you're working on - you can trim it up later. 

Pretty fringey bits! You can save this for table confetti if you like - so shiny!

Step Three: Turn your letter around. Trim away the excess tin foil along the edge of your letter to regain the shape of your letter.


Oh joy, you finished! Yay! In the end I decided to cut a triangle V out of my letter "Y" to make it look more "Y"-like. Then I had a fringey little triangle shape, so of course I turned it into a cake topper.
 Step Four: Turn your letters over and adhere it to a nice piece of string or twine using good old scotch tape.
Minted has these ridiculously adorable and insanely easy to use tissue paper fans for sale that add so much cuteness to your party set up in literally twenty seconds. If you are familiar with my party design style, I like a simple mix of modern, vintage, DIY and playful. The tissue paper fans did the trick as a sweet backdrop for my JOY garland. 
It wouldn't be a Coco Cake Land party without a cake! I made a chocolate cake with mint green peppermint buttercream piped in a vintage style. That "V" shape? I taped it onto a wooden BBQ stick and BLAMMO - cake topper! :) I found those pretty pastel scotch winter mints in the bulk section of the grocery store. 


Minted makes the cutest custom holiday cards probably ever! Love how my card turned out with my little T-man. It was so easy to make, too - go internets go!

Ah, DIY love! What word(s) would you make into a shiny silver letter garland? That was fun - see you soon, cake pals!

xo Lyndsay 

This post was sponsored by Minted.com. Order your Minted holiday cards now - total cuteness awaits! Tissue paper fans, cake stand, little cake sign and holiday cards also provided by Minted. All opinions expressed are my own - yes, I do love Minted! 

Wednesday, November 6, 2013

Ginger Maple Pumpkin Pie Recipe + Holiday Table Decor Tips


Today's post is sponsored by Minted.com

I've always been fascinated with American Thanksgiving, guys. It seems WAY huger than Thanksgiving is here in Canada - am I right? Kids travel home from college for Thanksgiving, people fly or drive thousands of miles and everyone comes together as friends or a big old family for a beautiful feast of love and food - kind of like how my family would do it up for Christmas. Planes, Trains and Automobiles is the perfect example- people want to get home THAT badly for Thanksgiving. 

Man, John Candy. What a guy. COMEDY!

As with any party I throw, I like to mix it up - for my Thanksgiving dessert table, I used vintage pieces (such as my pie server and 1960s modern brown teapot) with handmade decor, pretty linens and flowers from the garden, and Minted party supplies such as that crazy cute GIVE THANKS fall foliage designer banner. 

The fun thing about creating your own look and feel for your Thanksgiving party is that you don't have to follow the rules. The GIVE THANKS came as a banner with pre-cut holes and some cute twine to string it along - I decided to mix it up and use some Japanese washi tape to stick it up, instead. 

With the extra banner pieces, I cut out the leaf design shapes and adhered them to tall wooden BBQ sticks as unique cupcake toppers and put them on top of my wooden cake stand.

For more fall colours and texture, I clipped a stem of burgundy hued hydrangea from ye olde hydrangea flower bush in our front yard and placed it in a simple white egg shaped vase. Cute!

Cruciality: you have to have some WICKED AWESOME treats when you throw a party! I'm a baking nut (I'm sure you know this by now) and have been loving this spicy creamy pumpkin pie - black pepper, maple syrup and ginger pumpkin pie with a buttery gingersnap crust. Don't fear the pie! This one is stupid easy to make - top with not-too-sweet maple syrup whipped cream and you've got a pumpkiny knock-out pie.


Ginger Maple Pumpkin Pie with Black Pepper

For the filling, combine: 

1 can of pure pumpkin (around 400 ml)
3 eggs, whisked
1/2 cup brown sugar, packed
3/4 cup pure maple syrup
1 teaspoon ground ginger
1/8 teaspoon fresh ground black pepper (or to taste)
1/2 teaspoon fine sea salt
1 cup heavy cream (I used 33% percent)

For the crust: 

gingersnap crust (from Martha Stewart

1 3/4 cups gingersnap cookie crumbs. (I used Anna's Ginger Thins - I placed the content of about one and a half boxes into my food processor and ground it until crumb-like in texture).
1/4 cup brown sugar
1 tablespoon all purpose flour
1/2 teaspoon sea salt
4 tablespoons of unsalted butter, melted.

Melt the butter over the stovetop or in a microwave. Mix together all of the ingredients with the butter and press the mixture into a 9 inch pie pan. Bake at 325 degrees for 7-9 minutes until crust is set, being careful not to burn it. Let cool completely on wire rack.

To assemble the pie:

1. Pour the pumpkin pie filling into the cooled gingersnap crust. 
2. Bake at 350 degrees for 40-45 minutes until set.
3. Remove from oven and let cool completely on wire rack. 
4. Make your whipped cream!

Now, cut yourself a slice, plop a big old pile of whipped cream on top and enjoy!


This lovely post was brought to you by Minted.com! Find all of your Minted holiday decor right here - mix it up with some vintage and handmade DIY pieces - and you have a party to call your own! Woot!

What is your Thanksgiving or holiday decor go-to style? Easy breezy slam-it-up easy? Sparkly, ruthlessly edited and glitzy?Would love to hear! 

xo Lyndsay

Wednesday, October 9, 2013

I've Come To Suck Your Buttercream - Cute Dracula Cake DIY


Today's cake DIY is sponsored by Minted.com

Guys, it's Halloween season! Do you remember last year when I made a green hairy witch cat cake DIY for Halloween?

Let me refresh your memory:


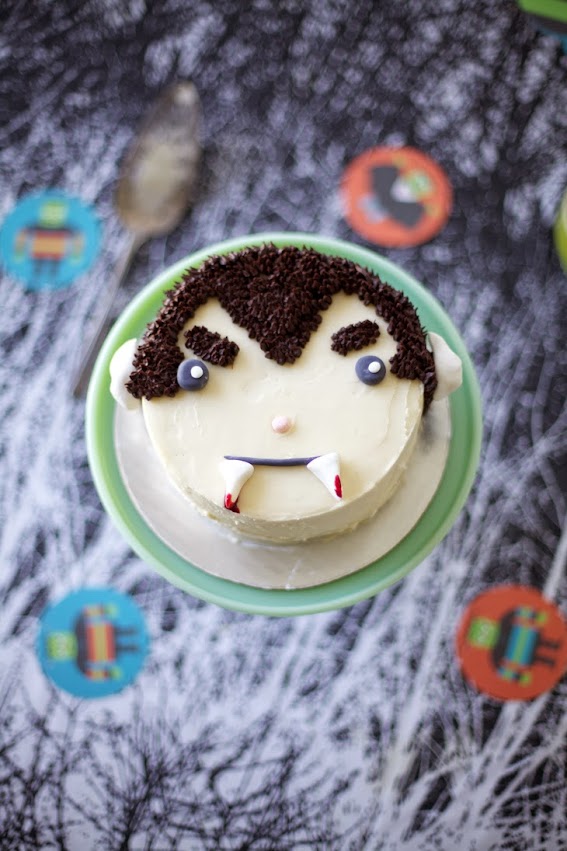
I know Halloween is supposed to be scary. But I just can't get into the super gory cakes and terrifying stuff - I prefer my Halloween light and bubbly with some cuteness thrown in... so I decided to make a "Coco Cake Land" version of a Dracula cake. It turned out pretty cute I think! Perhaps it looks a little more like Eugene Levy than I expected... but I like his hairy dark chocolate widow's peak and cutely evil face! 

Want to learn how to make Mr. Cute Face Dracula? Well here ya go!

CUTE DRACULA CAKE 

You will need: 

A two layer cake of your choice, baked and cooled
4 cups of vanilla buttercream for icing the entire cake
An offset spatula to ice the cake with
2 cups of dark chocolate buttercream for the widow's peak hair
1 piping bag fitted with a multi-opening tip (also known as the grass or hair tip)
Fondant to make the ears, teeth, eyes and mouth
Red gel food colouring for a little bit of fake blood

Make it!

You did it! Now that you've made your Cute Dracula cake, it's time to throw a party! Look at this adorable Halloween paper garland I got from Minted: cartoon Dracula, Frankenstein and non-threatening skull faces - perfect for a stylish kiddie Halloween party. I always think a garland is a party waiting to happen. Such simple decor but with visual (and easy!) impact!


I had extra circles from the garland so I scattered it on my party table like confetti. You could use them as coasters, too!


And are you eyeing up that gorgeous jadeite green cake stand? Minted carries a super cute line of party supplies, including milk glass cake stands. They're classic and the perfect pedestal to raise the roof on your cakes. I've wanted one forever and was habitually scouring Ebay for them for a good long while. 


What are you dressing up as for Halloween (or what are you forcing your kid to wear, like me? Haha... he's only one, guys.)

Last year Teddy was a lobster. There are so many amazing costumes rolling around right now, particularly from Kelly at Studio DIY - her cake slice costume made me FAINT. My favourite of the year so far though has to be this BRILLIANT and hilarious Kit Cat Clock costume from Handmade Charlotte!  

More Halloweeny times to come at Coco Cake Land! 

xo Lyndsay 

This Cute Dracula Cake DIY was sponsored by Minted. I really like their stuff and their design philosophy so it is no stretch for me to use their quite awesome modern designs with my cakes. Go there now to stock up on Halloween decor goodies!